-
Cream Cheese Frosting (on Sally’s Baking Addiction’s Hummingbird Cake)
Hummingbird cake is truly the most underrated cake flavor and I will die on that hill.
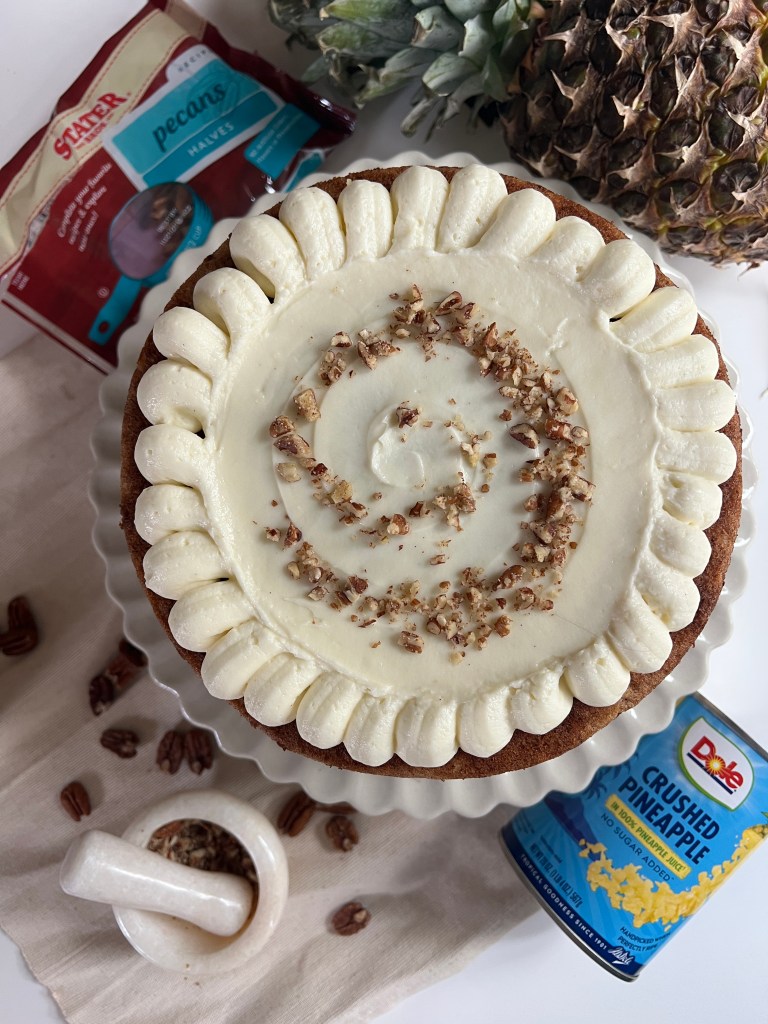
To be fair, I guess my standards aren’t really that high–any vehicle to shovel in cream cheese frosting is all good in my book and this is one of the best. For anyone not familiar with hummingbird cake, think of it as the love-child of a banana bread and a carrot cake, but elevated. Little specks of pineapple sprinkled throughout provide a slightly sweet balance to the nuttiness of the banana bread and the pecans, all inlaid within a warm spice cake.
I love this recipe as is but I do want to test a few other elements just for fun to see if they add anything to the cake:
- crushing the toasted pecans into a coarse nut meal that goes into the batter as opposed to full pecan chunks which can be somewhat texturally unappealing (a note from Claire Saffitz’s Carrot Cake recipe)
- blending real pineapple chunks instead of using canned pineapple
- adding ground mahleb (a Greek/Armenian spice reminiscent of almond and cherry)
Seriously though, this recipe is perfect and Sally from Sally’s Baking is my queen. It’s an oil-based cake, so it stays moist for daaaays and honestly maybe even improves? Personally, I think this cake is better at room temperature versus chilled in the fridge, which is usually how my preference.
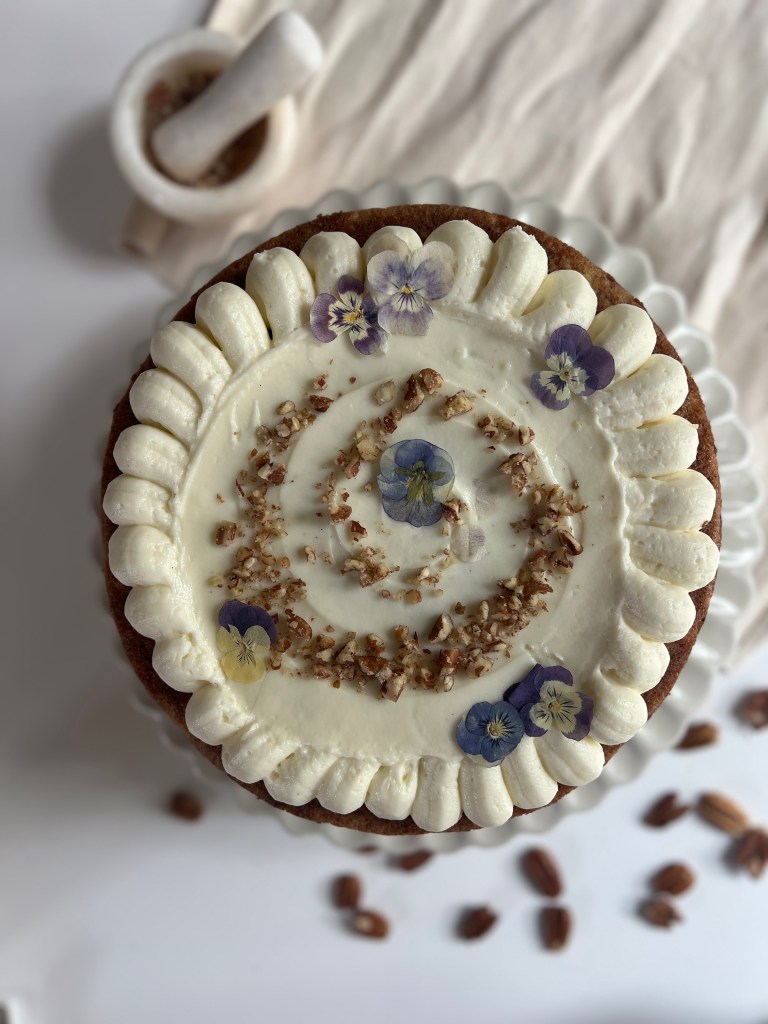
This cake always is a hit, especially the novelty of it. It’s perfect for every occasion! Birthdays, showers, holidays–it’s a perfect canvas for any decorating style, although I personally always love adding a touch of florals.
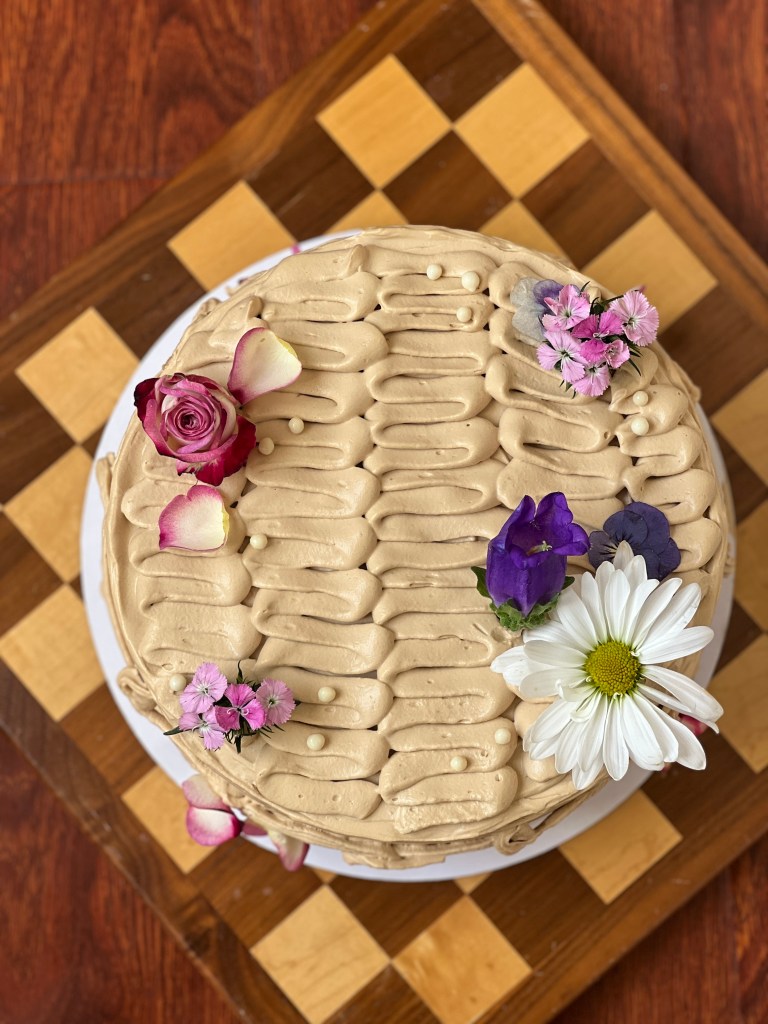
I’m a big fan of how the piping on this one turned out. I was actually trying to pipe rings of dollops around the whole cake but ran out of piping, so I had to improve and smooth out the middle. The pecan spiral just felt right, and voila–a new personal favorite cake design.
Okay, enough of that–the purpose of this post is really to share my whipped cream cheese frosting recipe, which I personally think is superior to others due to the following:
- Incorporating whipped cream lightens up the texture and makes it much lighter than a butter-based frosting, which pairs well with denser cakes (like carrot or hummingbird)
- Stabilized with a bit of pudding mix to make it a little more stable for piping designs
- Not too sweet! This recipe contains slightly less powdered sugar than most recipes and allows the tang to shine through
CREAM CHEESE FROSTING RECIPE
Makes enough to frost a 3-layer cake. Can be halved for a single layer cake.
INGREDIENTS
- 16 oz cream cheese (2 blocks), softened at room temperature
- 2/3 cup heavy whipping cream (150 g)
- 3 & 1/4 cup powdered sugar (405g), divided
- 2 tsp vanilla extract or vanilla paste
- 1/4 tsp almond extract (can reduce to 1/8 tsp)
- 1/8 tsp salt
- 1 TB instant pudding mix, vanilla
INSTRUCTIONS
- Set out cream cheese at room temperature to soften (30 minutes to 1 hour, depending on how warm your kitchen is).
- Beat softened cream cheese in a stand mixer or with an electric hand mixer until creamy, well-combined, and lump-free.
- Add extracts and salt and mix until combined.
- Gradually add 3 cups of powdered sugar (reserving a 1/4 C) into the cream cheese mixture, pulsing on low until combined.
- Sprinkle 1 TB of instant pudding mix and mix on low until just combined.
- In a separate bowl, whip heavy whipping cream with the remaining 1/4 cup of powdered sugar until medium peaks form.
- Fold in whipping cream into cream cheese mixture with a spatula until mixtures are combined.
NOTES
- Use brick cream cheese, full-fat preferred. That being said, I have made this with 1/3 less fat and there’s not a hugely noticeable difference, except maybe in texture. No spreadable versions allowed, though.
- Make sure there are no lumps in the cream cheese before moving on to the next steps. If your cream cheese still has lumps, it usually means it wasn’t softened enough. You can wrap a dampened warm towel around the bowl while beating the cream cheese to help. I usually leave the cream cheese out at room temperature for around 1.5 – 2 hours to be safe.
- If your powdered sugar has lumps, I’d recommend sifting it just to ensure there are no lumps in the cream cheese frosting. Trust me, it’s incredibly annoying once there are lumps in the final product and frankly irreversible at that point. With the price of cream cheese these days, we can’t afford mishaps!
- I like using vanilla bean paste (Trader Joe’s has a great one) so that the vanilla specks are sprinkled throughout, which I think provides a nice aesthetic as well as flavor.
-
Q1 Bake Reviews
I thought it’d be fun to share some bakes I did this quarter! Tried out a lot of fun recipes and per usual, I have rambling thoughts on everything. Baking for content creation has actually really inspired me to do more unique bakes, which has been a lot of fun (and expensive, since I now feel justified in purchasing the bougie ingredients for really no reason at all).
It’s been a pretty depressing few months with the state of the America right now, and the news cycle each day is enough to send anyone into a spiral. One of my core principles is that life is meant to be enjoyed, not hustled–but it’s getting harder to live a simple life filled with simple things when everything is burning all around us.
On the bright side, I’m more incentivized to volunteer wherever possible! I’m going to start baking for a local organization that provides cakes for underprivileged kids called For Goodness Cakes, which is just the cutest thing I’ve ever heard. More content forthcoming.
With that, here’s what I baked this quarter and my thoughts on each:
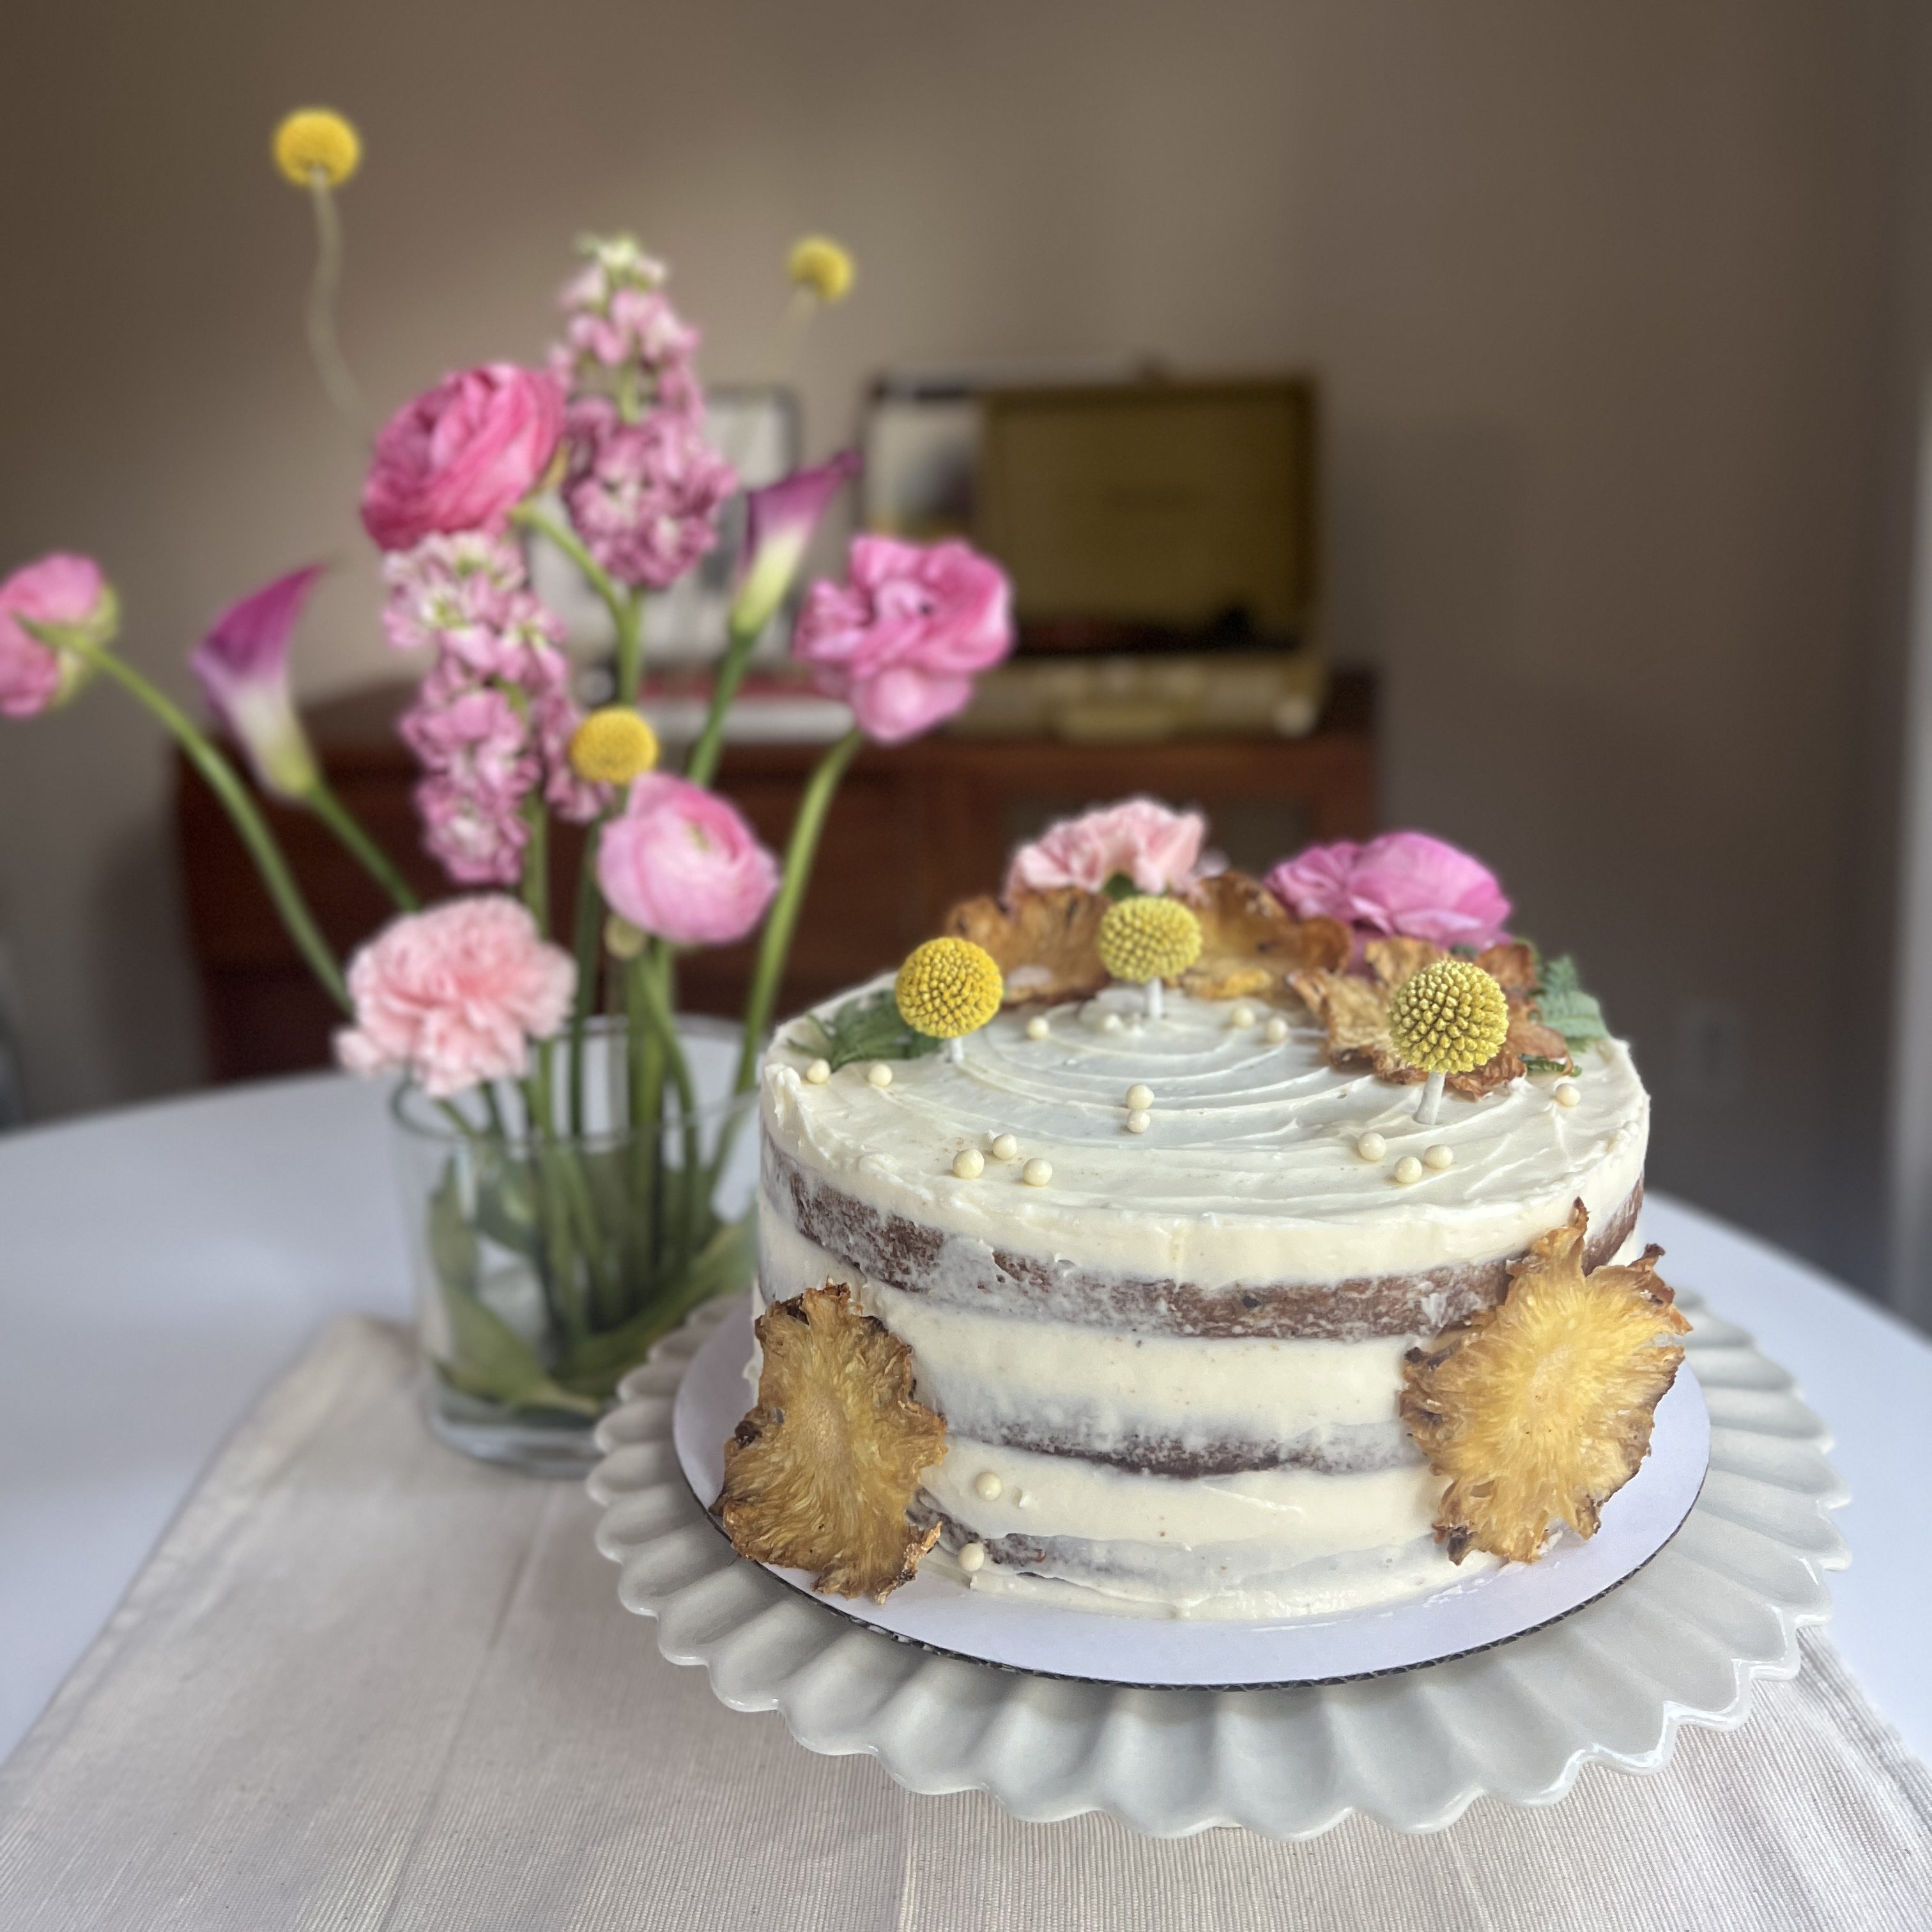
Marble Cake + Whipped Cream Cheese Ganache + Toasted Coconut Caramel Filling
Cake by Cleo Buttera: https://cleobuttera.com/cakes/moist-and-tender-marble-cake/
Ganache by Savvy’s Kitchen: https://cupcakesavvyskitchen.com/white-chocolate-cream-cheese-ganache/
Caramel/Coconut Filling by Broma Bakery: https://bromabakery.com/how-to-make-homemade-caramel/ | https://bromabakery.com/samoa-cake/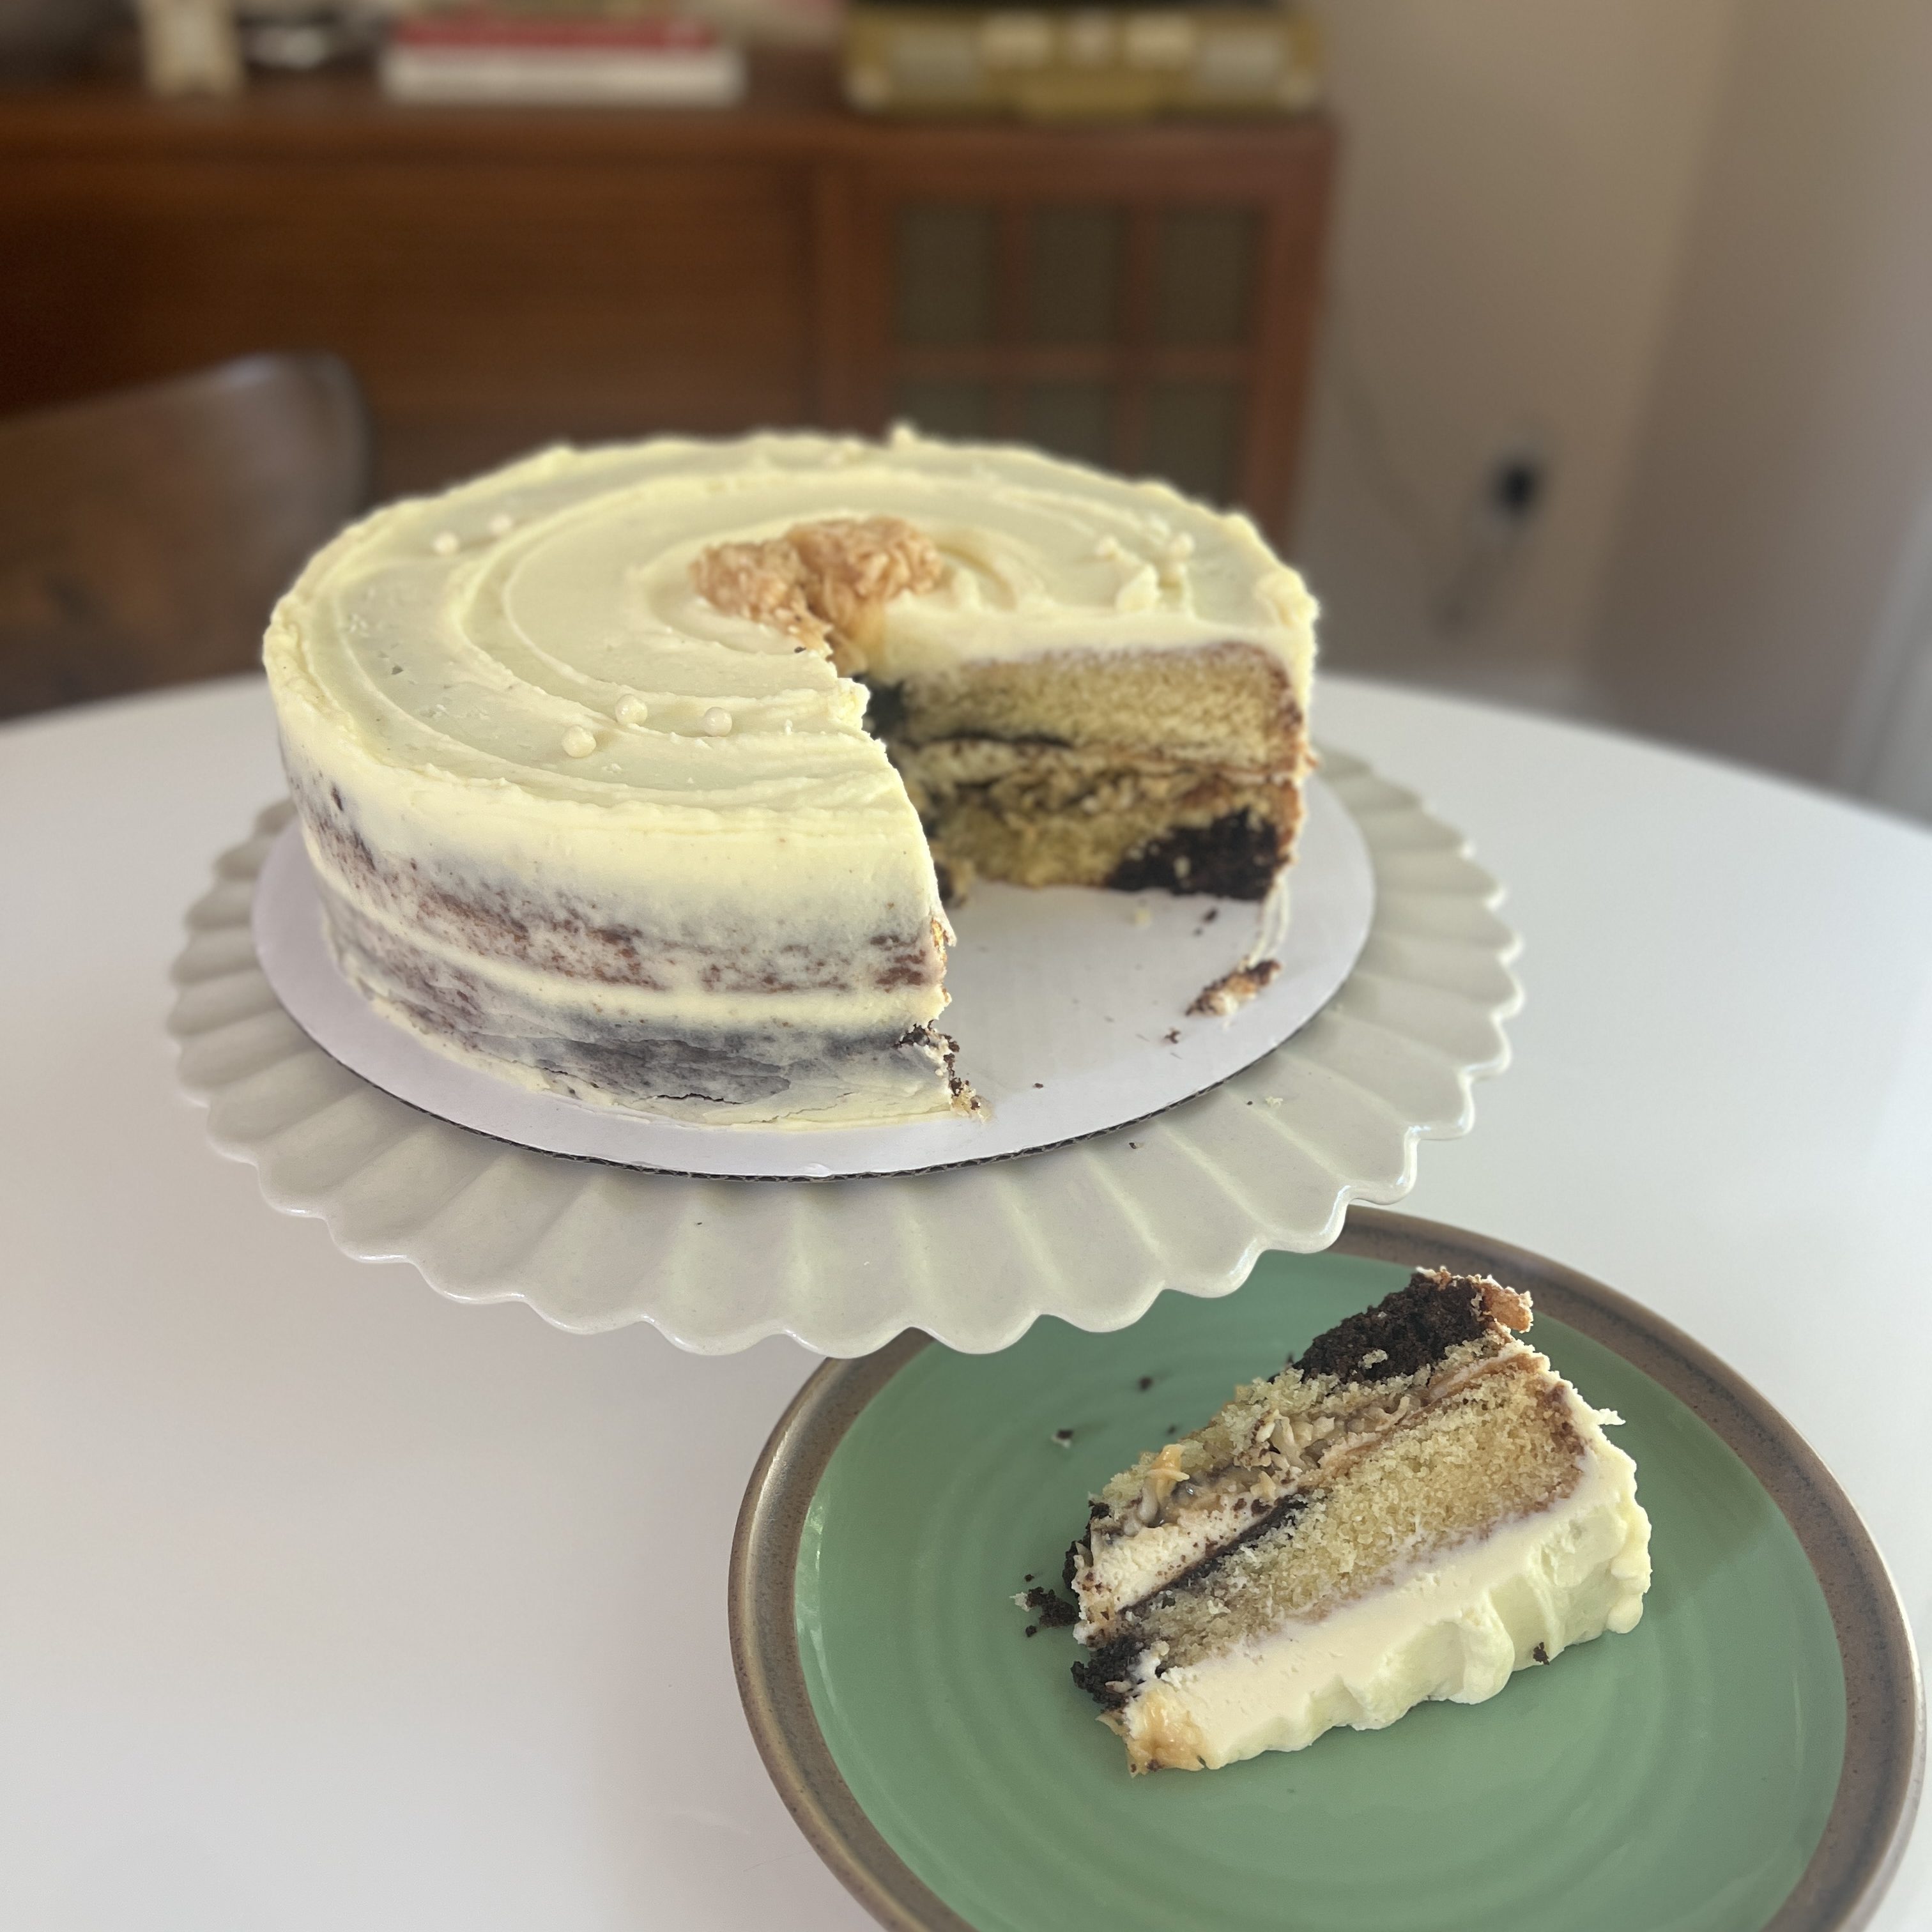
Overall, I thought this was a great cake! I did modify Cleo Buttera’s cake recipe by swapping out half the butter for oil, since I have an affinity for oil cakes over butter cakes– all-butter cakes just get so dry for the subsequent days and I knew this cake would sit in our house for at least a few days. I do think it helped the longevity, we still got the flavor of the butter but the texture stayed great at room temperature. The chocolate part of the marble was delicious, likely due to the steps in the recipe to properly bloom the cocoa powder in hot milk/butter before mixing with the batter. I actually got wind of this recipe from PancakePrincess, who rated this one pretty high on her list. It’s a yes from me!
It was also my first time making a ganache! I picked up a bulk bag of Callebeaut’s white chocolate for this (a whopping 5.5 lbs from Restaurant Depot, and worth every penny–also the MOST fun store). This frosting was delicious, kept well, and retained shape. I think it’d be amazing piped onto cookies as well. It was also great that the frosting had no butter, since I’m also butter-adverse for frostings as well (this is an anti-American-buttercream blog, sorry-not-sorry).
To be clear, I love butter as an ingredient for most desserts, but not in cakes and frostings. Texturally, it never does what I want it to. I let butter shine in pastries, custards, creme pats, etc.
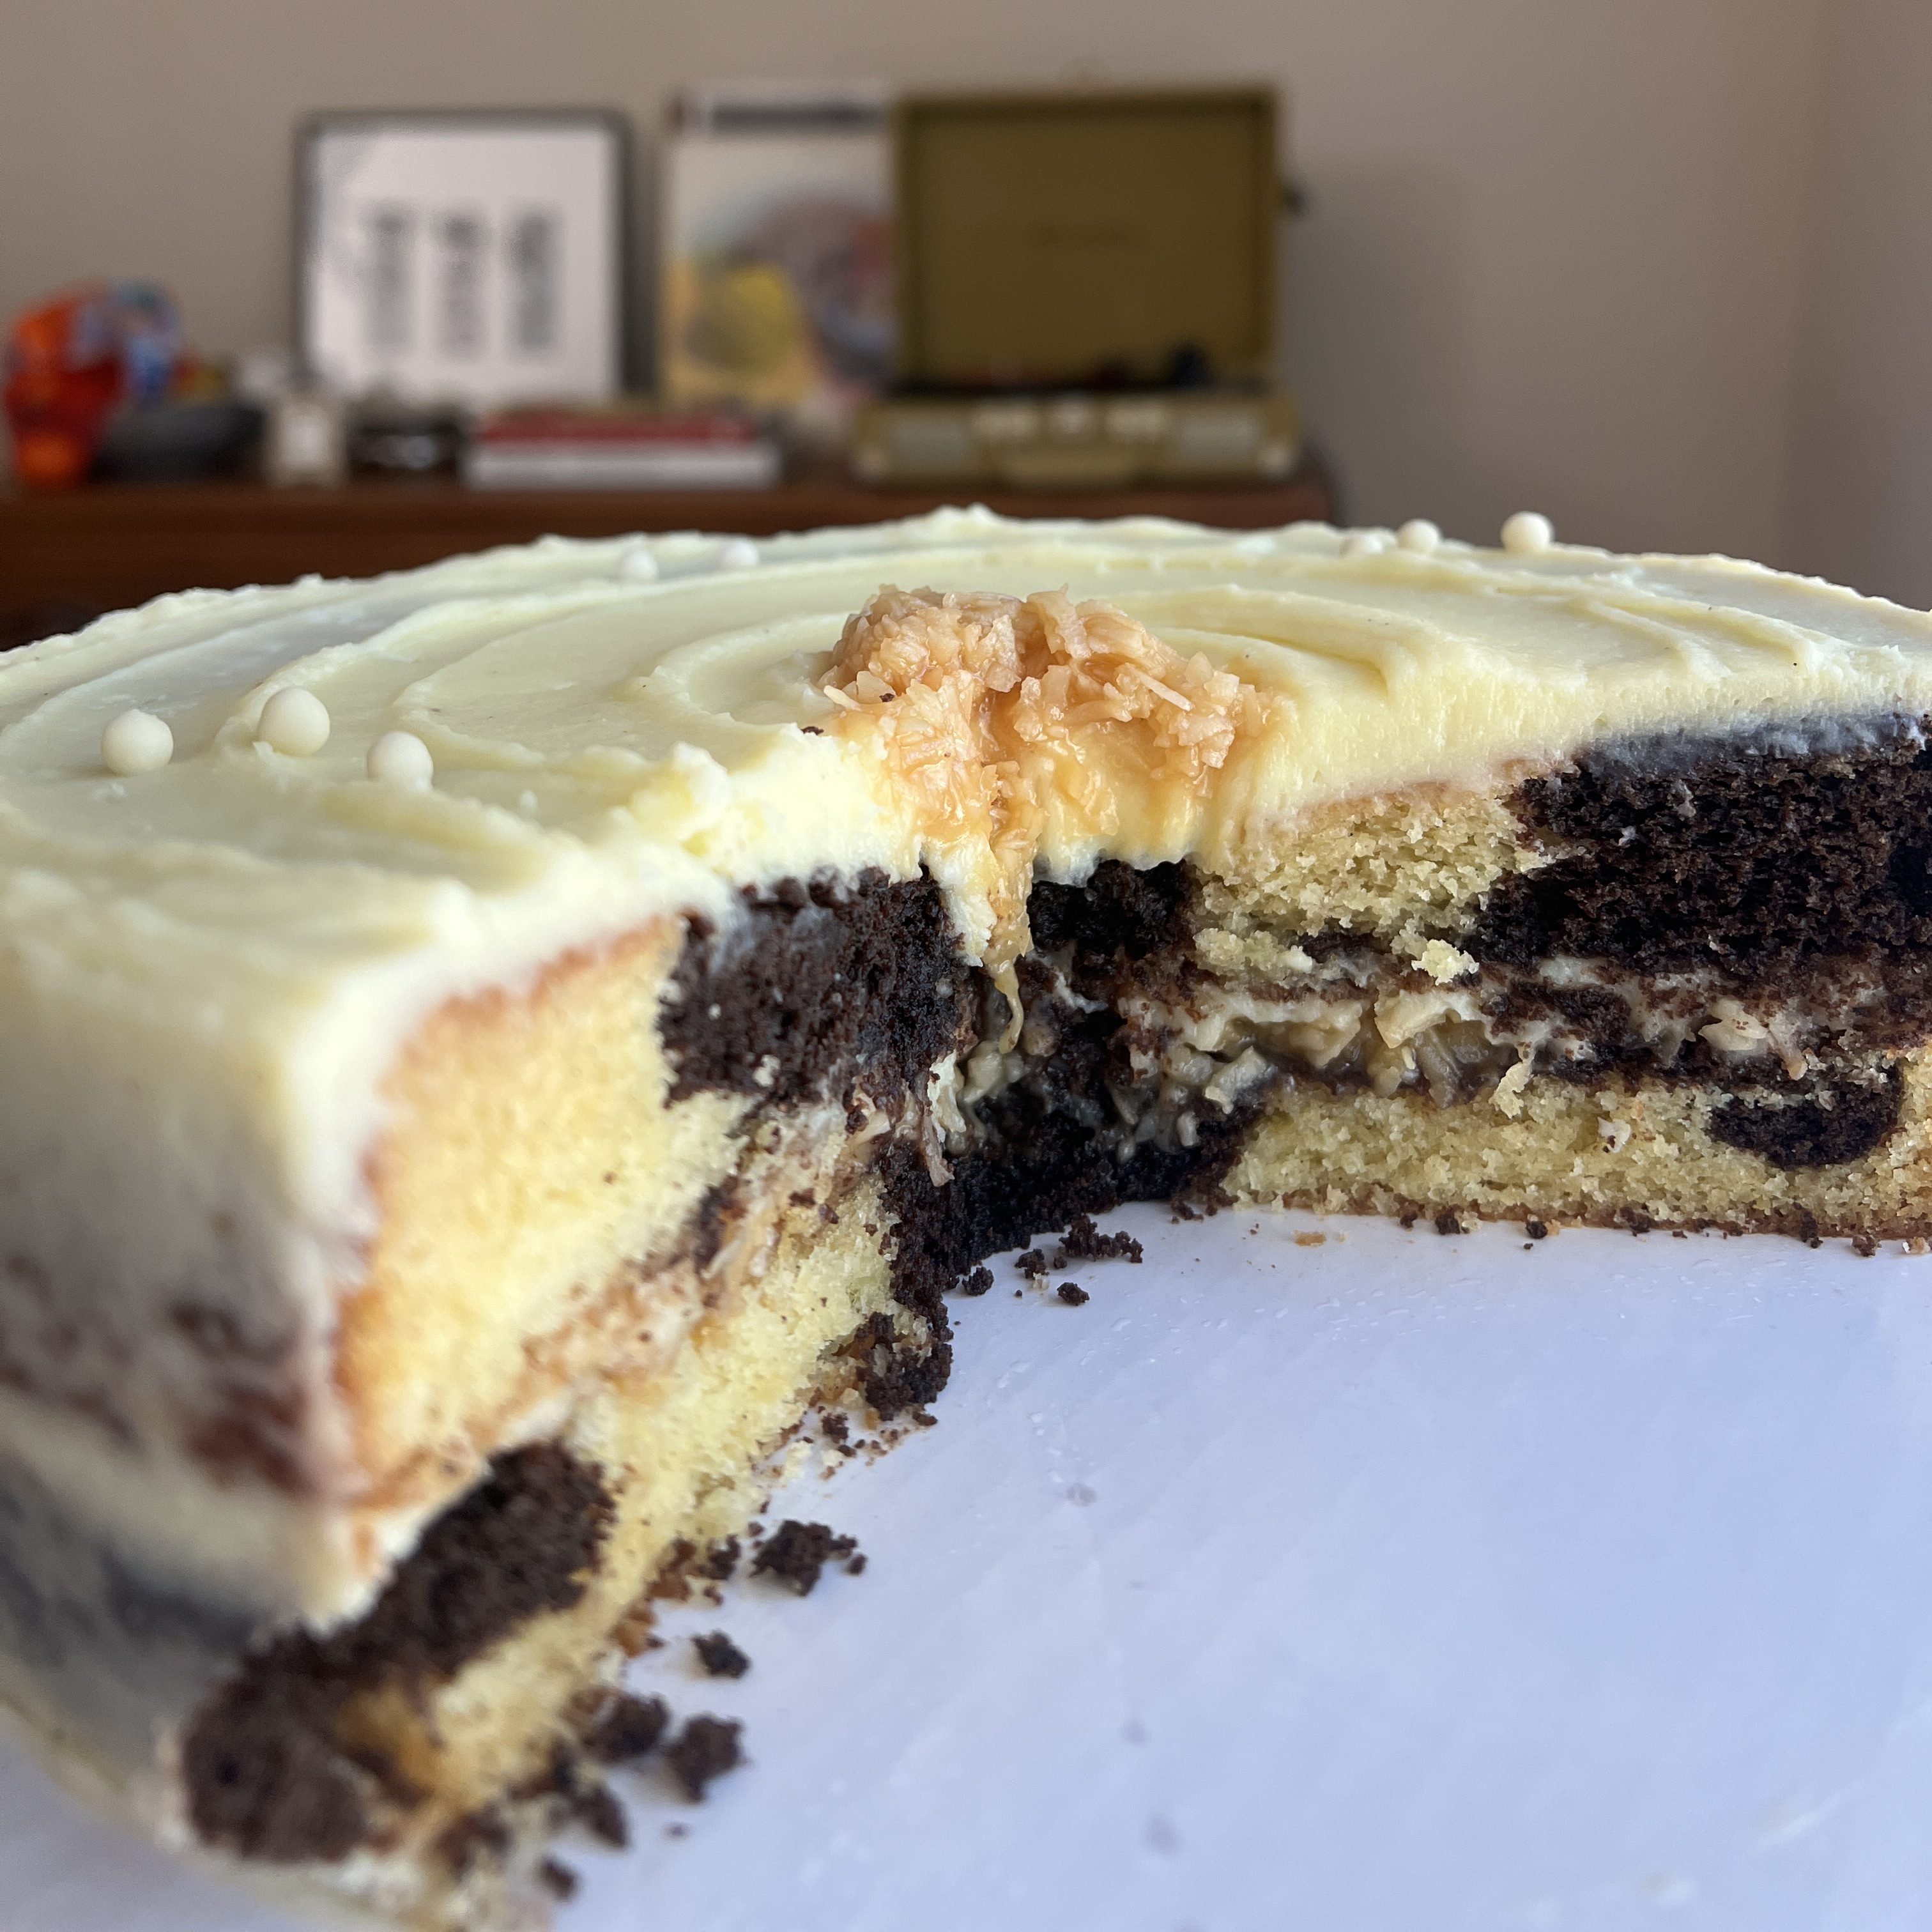
This was also my first foray into making caramel and I was THRILLED when it didn’t seize. I’ve had a lot of mishaps making Christmas Crack during the toffee step, so I was nervous. I will say that it took a lot longer than the recipe said it would (likely because I’m on a convection stovetop, which I abhor) but we persevered and we pervailed. Overall, this was a pretty easy recipe to follow and especially delicious mixed with shredded coconut for the filling of this cake (plus more ganache), as inspired by Girl Scout’s Caramel Delites,, which was the inspiration for this birthday cake for my boyfriend who orders far too many boxes every time the new year rolls around. I also double-purposed the extra caramel in a homemade banana caramel cold brew, which was *chef’s kiss*.
Rating: 3.9/5 – While each of the components were good, I do think each element was a little too sweet, which overall combined into a cake that was too sweet. However, texture and flavor of everything was good, if not a little one-note. I’m also not sure if I thoroughly loved my pairing of coconut-caramel with cream cheese… although to be honest, I’m a much bigger fan of floral, lighter notes than these darker caramel notes. I’d maybe add a little more salt to the ganache next time and maybe go without the caramel-coconut filling and simply fill with more ganache.
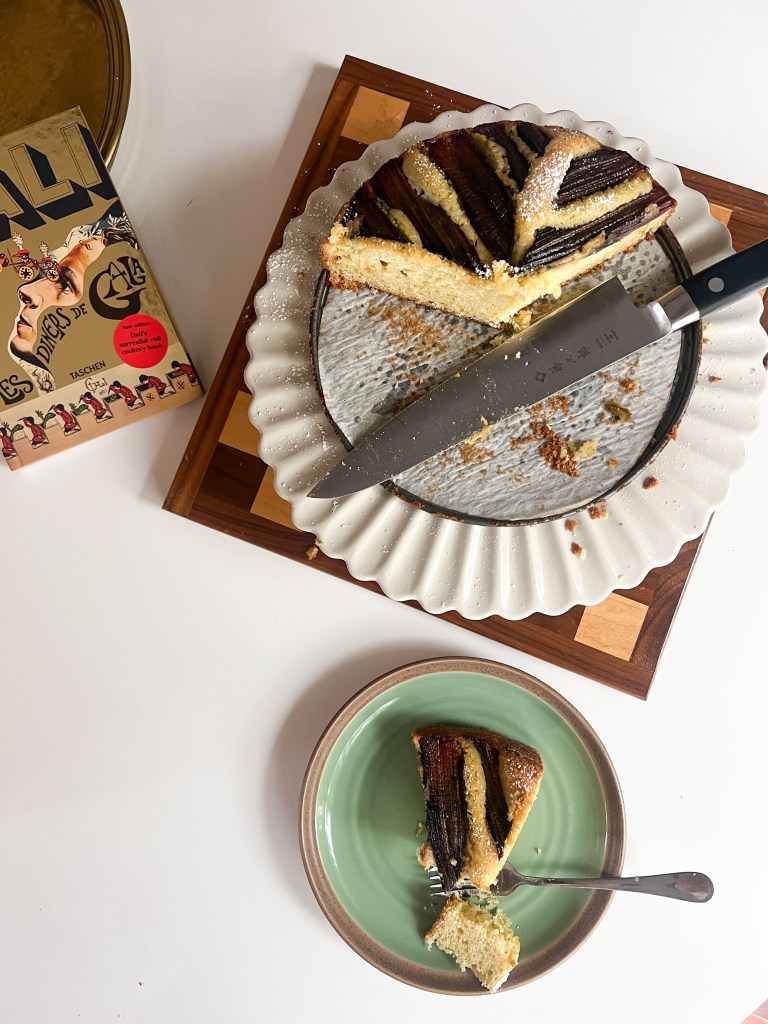
Rhubarb Coffee Cake
Recipe by KatieBirdBakes: https://www.katiebirdbakes.com/rhubarb-cake/
This one is a special one because this is a recipe from my new colleague! I started a new corporate job a few months ago and shared my baking interests as an icebreaker (an easy go-to for me, personally). Very quickly, I was notified by everyone that one of my colleagues ran a very successful baking blog, linked above. Cue my inspiration to start this entire journey of my own, so to you, Katie, who will likely never see this: a true hat tip to you.
I’ve never consumed, bought, nor purchased rhubarb before so it was a quick trip to my local farmer’s market to purchase said ruby red stalks. I’ve lurked on multiple rhubarb recipes before so it wasn’t hard to pique my interest.
For whatever reason, the rhubarb lost all of its color in my oven, likely due to me placing my pans on the top row too close to the heat source. The cake itself was INCREDIBLE, as I love any almond-flavored desserts. The rhubarb, I didn’t really understand. It was kind of stringy and hard to cut and chew through, so I chalk it up to my user error of cutting them into stalks that were too small and potentially overcooked too quickly. In any event, the cake was delicious and a perfect way to purpose my new cake stand gifted by a beloved friend.
Rating: 3/5 – in no way does this reflect a review of the recipe but rather the result of my baking and also a remark on how I feel about rhubarb overall!
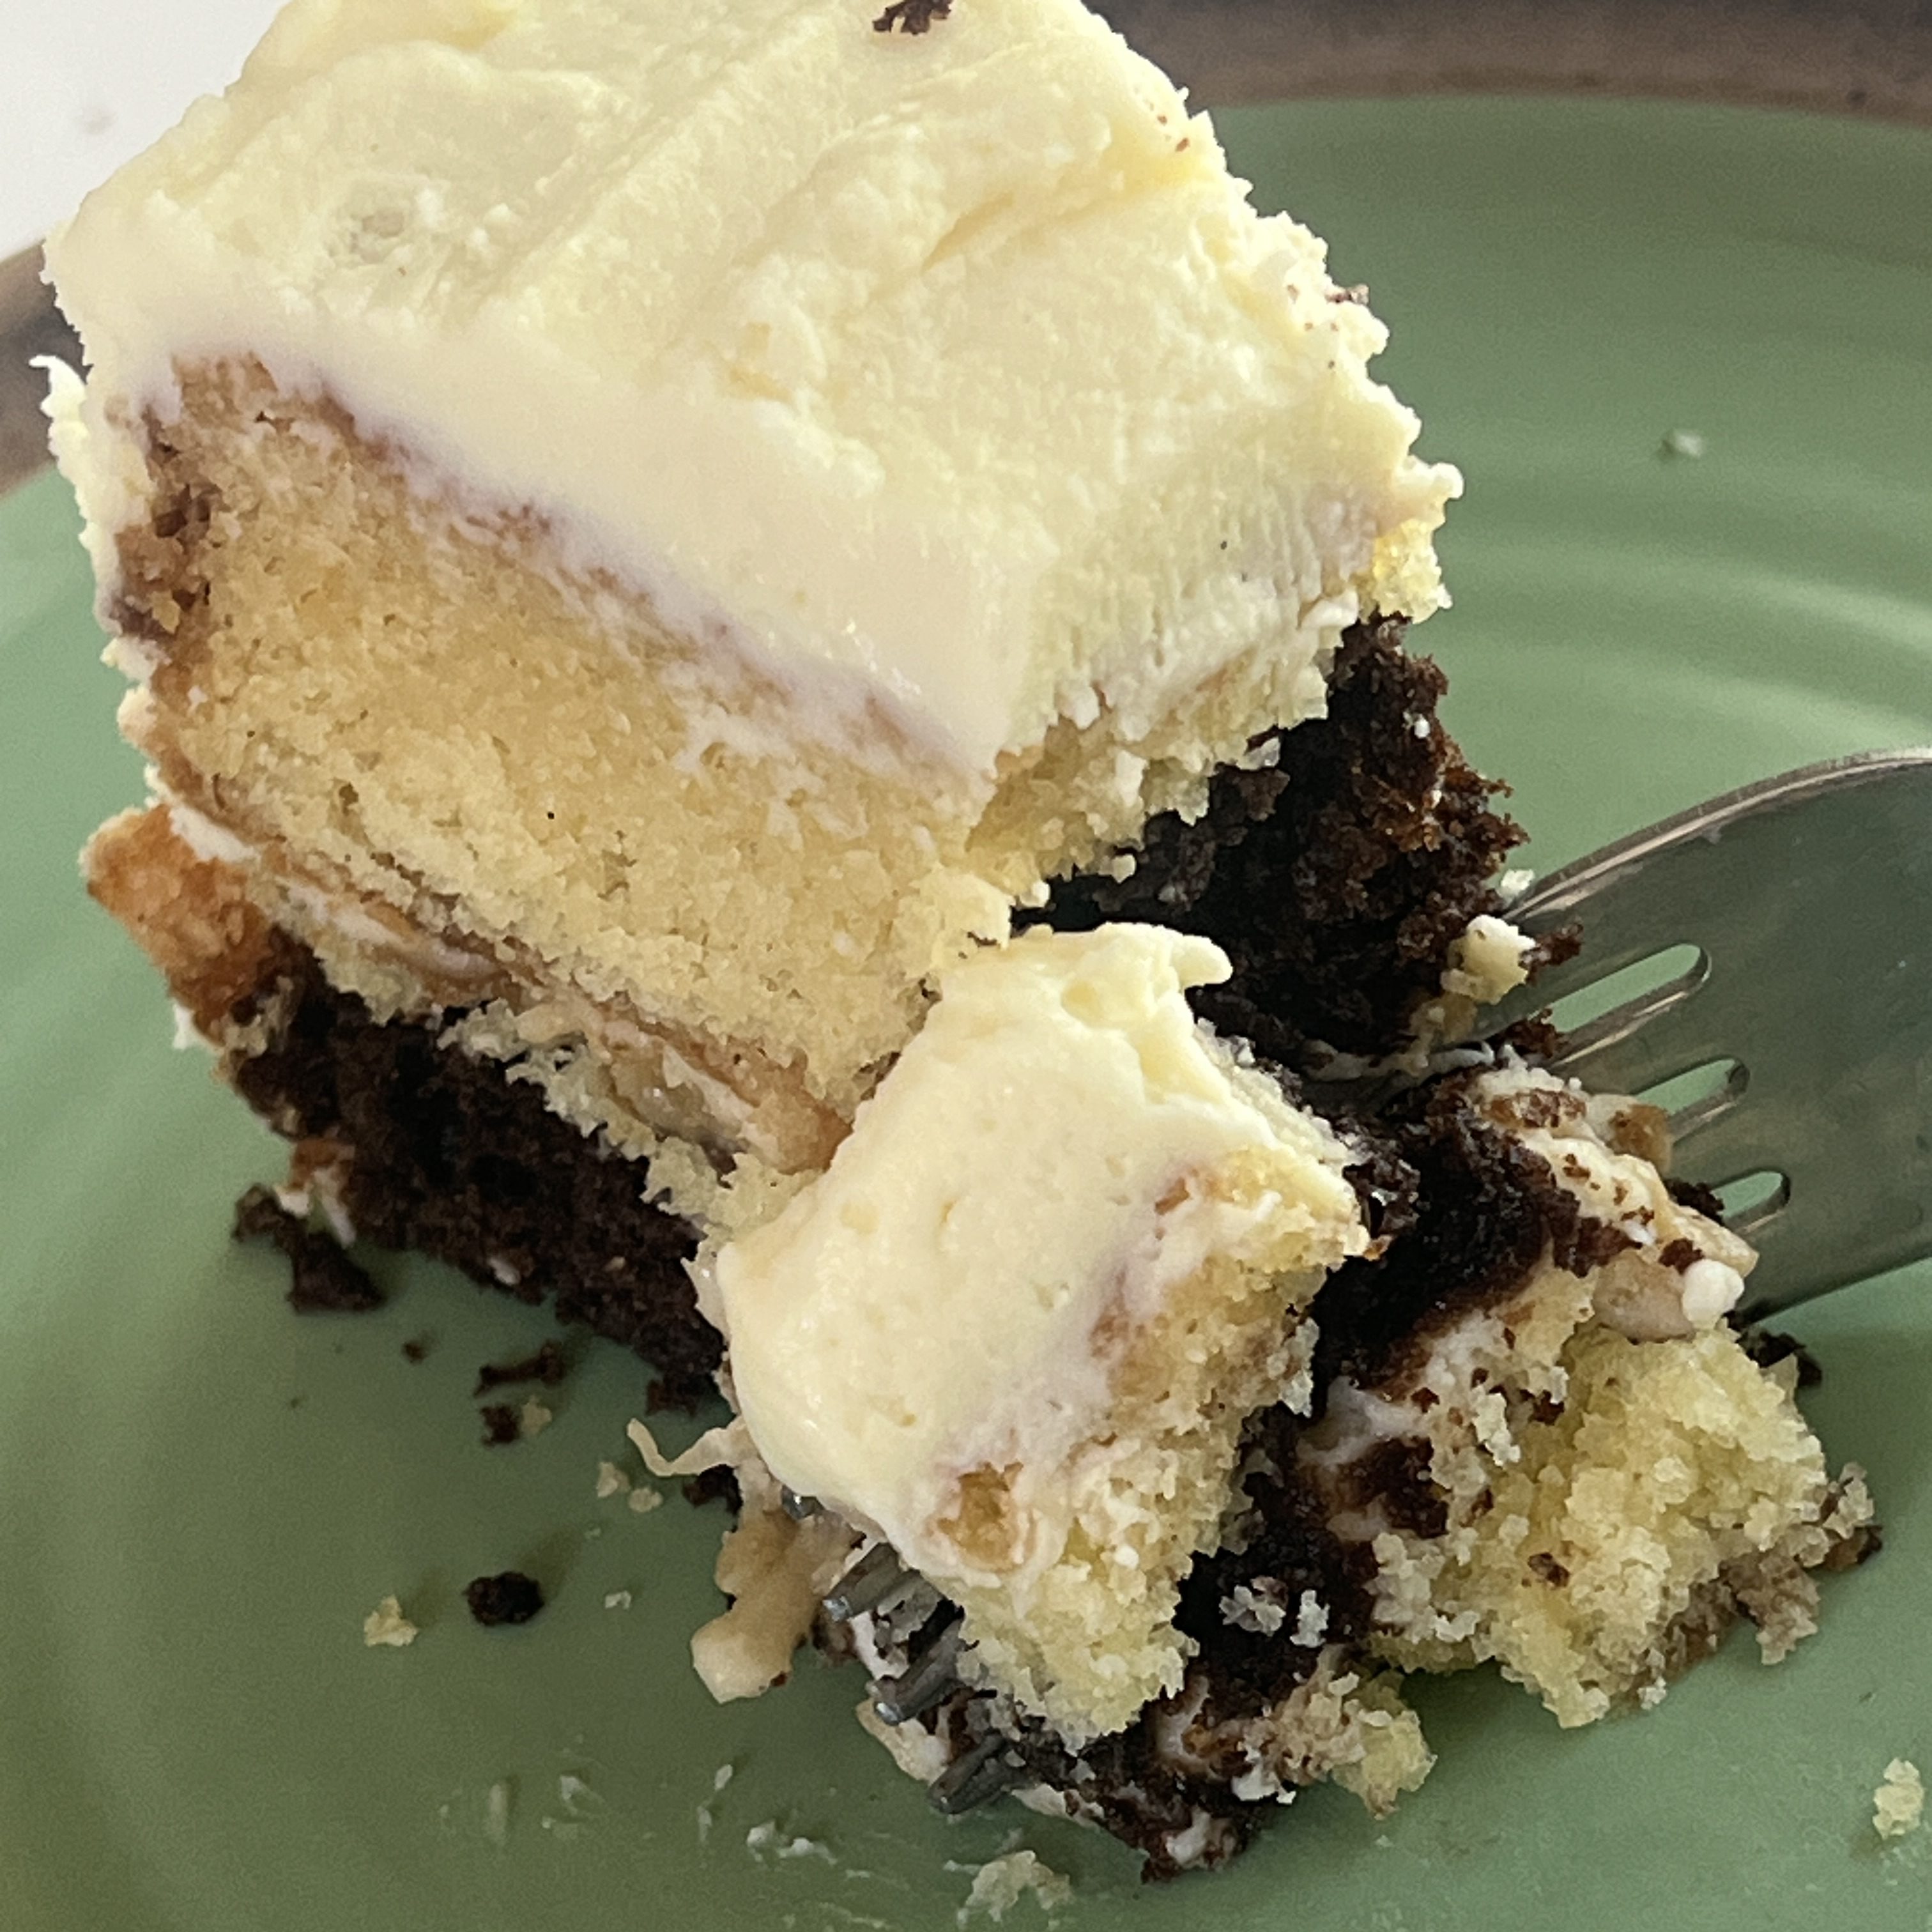
Hummingbird Cake
Recipe by Sally’s Baking: https://sallysbakingaddiction.com/hummingbird-cake/
This is a tried-and-true recipe and a staple in my book. I absolutely adore this cake and it’s always a hit! Mainly for my boyfriend’s coworkers, who are the main recipients (lol). Not enough people know about hummingbird cake, which is a crime on humanity if you ask me. Not that I don’t love carrot cake, but hummingbird is a close second. In the same vein of spice cakes, next on my list is a morning glory cake!
This recipe is also SO EASY to put together! It all comes together mostly in one-bowl and can be made by hand. The texture on this one stays moist for days (because it is, after all, an oil cake) and combined with cream cheese frosting, it’s an absolute dream.
My cream cheese frosting is basically the same as Sally’s, except sub out the butter (shocking, I know) with 2/3 cup of heavy whipping cream instead. I whip the cream separately and then fold it into the cream cheese to lighten up the texture.
This cake was made for my boyfriend’s manager who lost his mom a few years ago, on her birthday. I also made an ikebana arrangement so the use of flowers on the cake was a no-brainer and made for a lovely, cohesive gift.
Rating: 5/5 – This is a perfect cake IMO. No marks.
-
Coffee Mocha Cake
Asian-bakery inspired coffee flavored cake with a vanilla-almond sponge frosted with coffee whipped cream
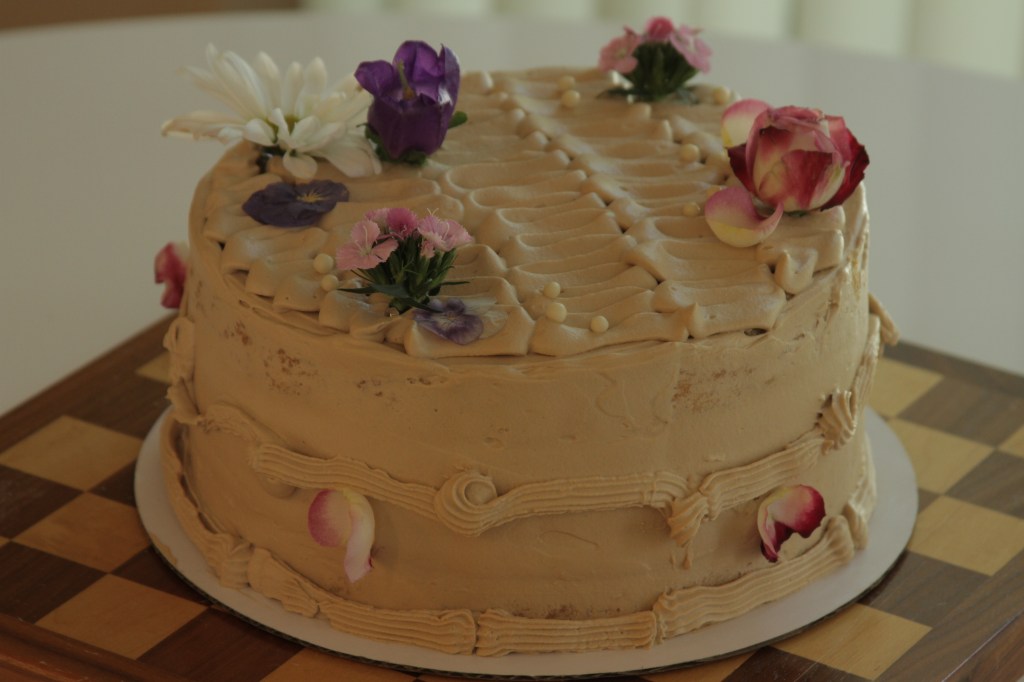
This cake is my pride and joy, my signature among my family and specifically, my Vietnamese mother and aunt who will dole out the coveted compliment of “not too sweet” if I deserve it–and on the flip side, will absolutely not hold back on any criticism. Even as a self-proclaimed sensitive person, I truly believe in transparent, frank feedback when it comes to baking. When it comes to feedback in my corporate job… I’m maybe a little less receptive. Does anyone actually enjoy constructive criticism or is that a lie we’ve been fed to respond with during interviews? Clearly, you can tell my true thoughts on the subject.
The sponge itself is Michael Lim’s Vanilla Cake recipe, a tried-and-true recipe published on Youtube in 2016: https://www.youtube.com/watch?v=A3qNclBDhWs
The only thing I add is almond extract, which I think compliments the bitterness of the coffee frosting. I will say that I adjust this depending on if the audience is almond-adverse (which, to me, is insanity… but I digress). You can dial it back to 1/8 tsp but I love an almond-forward sponge.
The cook time and temperatures for my recipe are also different – for Lim’s sponge, he cranks up the temperature at the end to brown the top. For my recipe, we actually don’t want any browning and will be scraping off the top eggy layer of the cake that forms, since I feel like it affects the mouthfeel.
Lim’s recipe also calls for a 6″ springform cake for a taller cake, whereas I call for roughly the same amount of batter for each 8″ round cake layer. This recipe is written for a three-layer 8″ round cake, scaled up 2.5x of his original recipe. I’ve found that this is the perfect layer thickness. However, I’ve definitely made this with a 2x recipe for a 2-layer cake, which results in slightly thicker cake layers that can definitely be sliced in half to make four thinner layers, if desired.
The frosting recipe is my own, through MANY trials and tribulations – and by tribulations, I mean that it took me maybe a year of making this cake consistently before I finally started writing down measurements instead of eyeballing it every time. Blame my undiagnosed ADHD.
This cake is reminiscent of the Vietnamese bakery cakes in Westminster, CA (notably, Van’s Bakery, IYKYK) that were reserved for Special Occasions, since they were considered a luxury with a high price point for my family. Of all of accomplishments, of which there are very few, I think I can honestly say this cake is the one evokes the most pride from my mother (hilariously enough). But my true source of validation comes from her older sister, my aunt–she’s the esteemed cook in the family, so as a Bad Cook, Better Baker, you can imagine how much joy it evokes when she brings out her Tupperware to request a take-home portion of the cake every time.

Enough blabbing – here’s the recipe!
EQUIPMENT
- 3 8″-round pans
- parchment paper (cut into rounds)
- stand mixer or hand mixer
- spatula
INGREDIENTS
VANILLA ALMOND SPONGE CAKE
- 10 egg whites*
- 2 1/2 tsp vinegar
- 300 g sugar
- 10 egg yolks
- 300 g all-purpose flour
- 1 1/4 tsp salt
- 75 ml oil
- 100 ml milk (whole milk preferably, but non-fat or non-dairy will still work)
- 1 1/4 tsp vanilla extract
- 1/4 tsp almond extract (optional, can reduce to 1/8 tsp)
SYRUP SOAK
- 3/4 cup sugar
- 3/4 cup water
- 1/4 tsp vanilla extract
- 1/8 tsp almond extract (optional, can omit)
COFFEE WHIPPED CREAM FROSTING
- 3 1/2 TB instant coffee + 1 TB hot water
- 720 g heavy whipping cream (cold from fridge)
- 83 g powdered sugar
- 1/4 tsp cocoa powder
- 1/2 tsp vanilla
- 1/8 tsp almond extract (optional – can omit)
- 2 TB instant pudding mix (white chocolate or vanilla)
*Egg whites and yolks should be room temperature. I recommend separating whites and yolks while cold and then leaving to sit 30 minutes to get to room temp.
INSTRUCTIONS
SPONGE CAKE
- Heat oven to 307 degrees (can go to 305 if oven only goes in 5-degree increments). Line cake pans with parchment paper rounds.
- In a small bowl, combine milk, oil, and extracts. In a separate medium bowl, whisk flour and salt together. Set aside.
- In a separate small bowl, whisk egg yolks until smooth and no lumps remain.
- In the bowl of a stand mixer, add eggs and vinegar. Whip until egg whites are frothy/opaque. Add sugar one tablespoon at a time until sugar is fully incorporated and stiff peaks form.
- Pour in half of egg yolks and fold by hand with a spatula to combine. Once there are no further yellow streaks, pour in the second half of the yolks and repeat.
- Sift in the flour mixture in 3 parts. Fold in the first one-third of the flour mixture by hand with a spatula. After the flour is incorporated, add in half of the wet mixture. Fold by hand with spatula. After the wet mixture is incorporated and no pools remain, add the second third of the flour mixture and fold. Add in the second half of the wet mixture and fold. Repeat with the last third of the flour mixture until wet and dry ingredients are fully ingredients, taking care to scrape and fold the bottom of the bowl so there are no pockets of flour remaining.
- Divide the batter equally between three rounds. Using a toothpick or skewer, start in the middle of the pan and make concentric circles to the edge of the pan to get rid of any air bubbles.
- Bake for 24-27 minutes, or until edges of the cake are slightly darkened. The top of the cake should still be pale. Test by inserting a toothpick into the center and remove the pans if the toothpick comes out dry.
- Allow cakes to cool in pans for 10-15 minutes, or until the edges pull from the pan naturally. Invert onto wire racks and allow to cool completely before adding frosting.
TIP: If making ahead of time, soak layers in syrup (see instructions below) before wrapping tightly in saran wrap and keeping at room temperature. Do not refrigerate. Layers will keep for 1-2 days.
SYRUP
- Add water and sugar into a small saucepan on stove over low-medium heat. Stir until sugar is dissolved, then remove from heat. Let cool before using.
FROSTING
- Mix instant coffee granules with 1 TB of warm water. Stir until dissolved. Set aside to cool (around 5 minutes) before adding to frosting mixture.
- Combine heavy cream, powdered sugar, vanilla extract, and almond extract to a stand mixer bowl (or if using a hand mixer, add to a heavy-bottomed bowl). Beat with a whisk attachment until mixture is thickened, but before reaching soft peaks.
- Slowly drizzle in the coffee mixture down the sides of the bowl while continuing to whip.
- Slowly increase to medium/high until reached medium-stiff peaks.
- Sprinkle in pudding mix and whisk by hand to combine until stiff peaks form. Cream should hold its shape and pull away from the sides.
- Use immediately or refrigerate overnight. This can be made overnight and will keep for 1-2 days.
CAKE ASSEMBLY
- Brush enough syrup to thoroughly soak the first layer of cake.
TIP: You can also pour into a squeeze bottle for easy distribution but it may lead to over-soaking the cake layer, which would make the cake gummy. - Spread roughly 1 and a 1/2 cups of frosting onto the layer.
- Add the second layer on top and repeat the process. Top with the remaining cake layer, and cover the top and side of the cake with frosting.
- Chill.
-
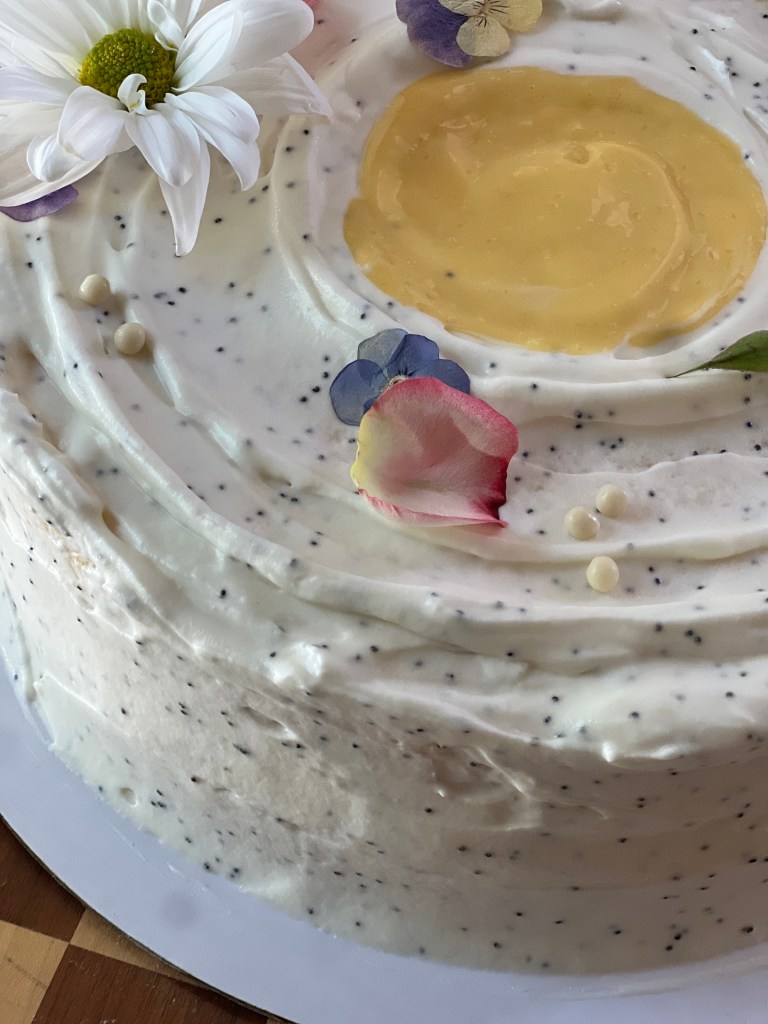
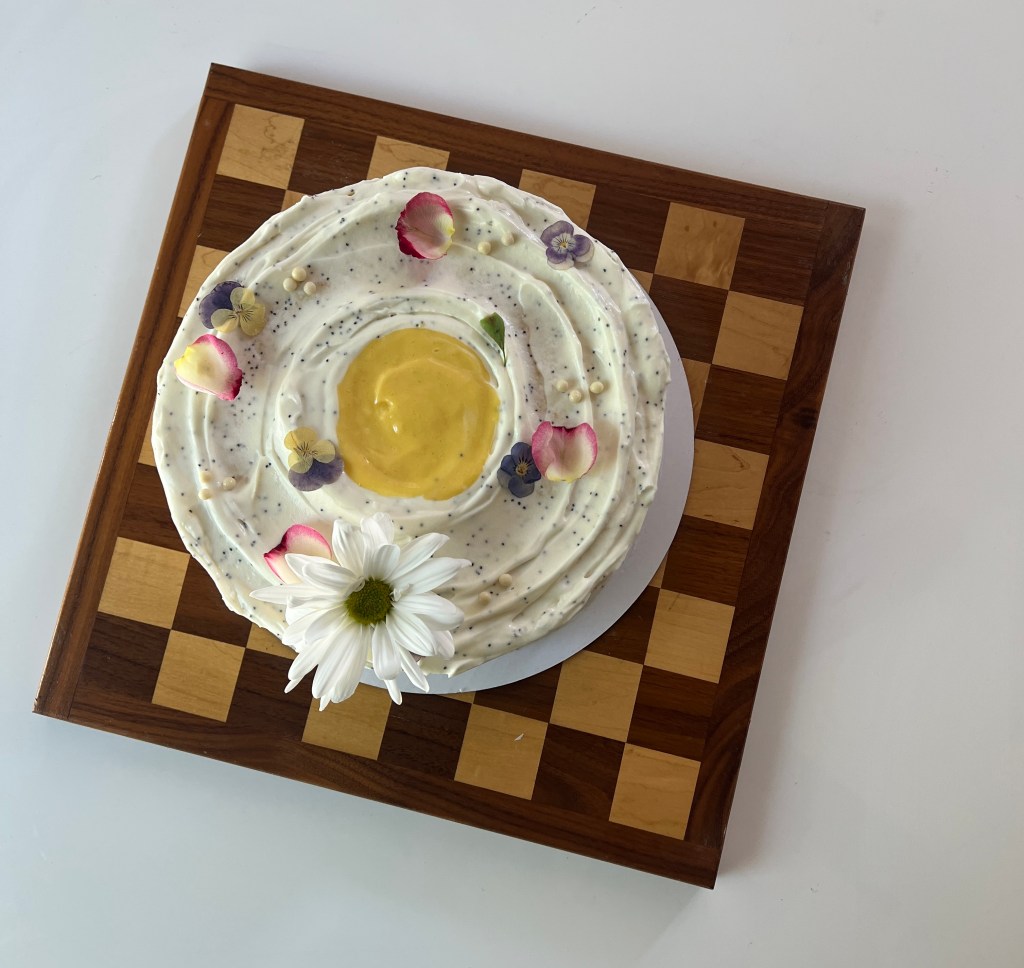
Lemon Layer Cake with Poppyseed Cream Cheese Frosting
Lemon sponge cake with lemon curd filling and poppyseed cream cheese frosting – Spring in a cake!
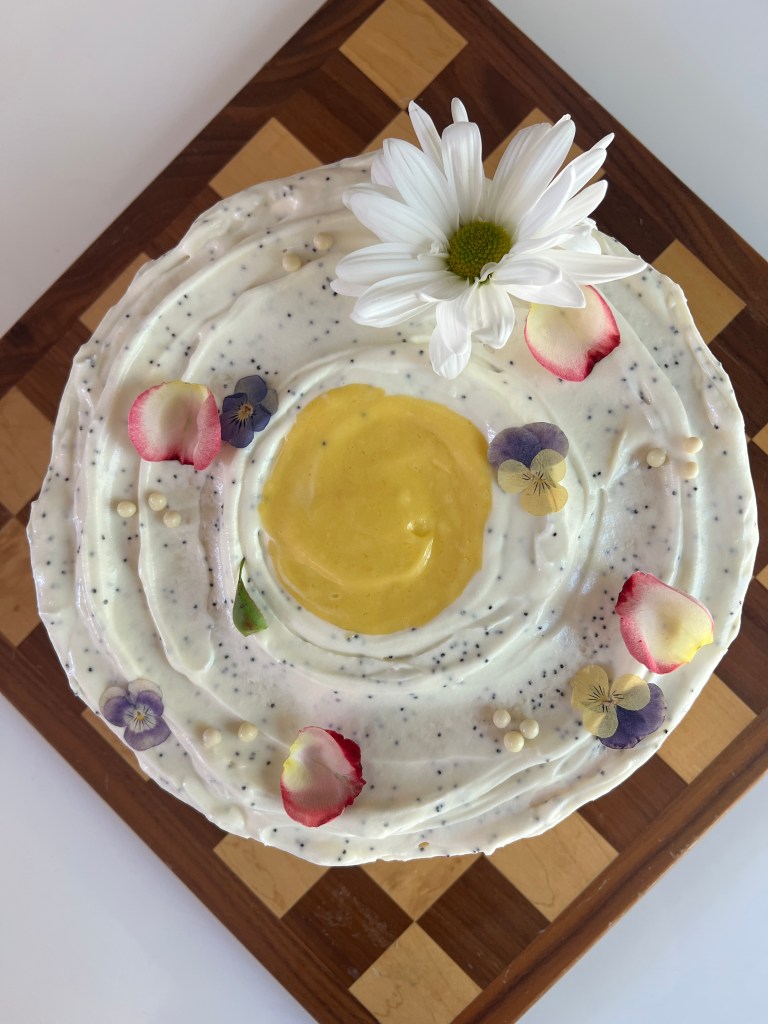
Vernal equinox, where we officially escape the dreariness of winter and see the ray of light that is spring, was the perfect day to bake this spring-evoking lemon on lemon cake.
To be honest, I’m surprisingly not a huge lemon fan, now that I’m older. Shocking, considering I grew up with the odd affinity of liking the yellow Starbursts the most, and also had both words “lemon” and “angel” in my first AIM screenname (is…that the right term for it? “screenname”? am I aging myself?).
I do, however, share a soft spot for the lemon flavor profile given that one of my best friends loves lemon, and therefore I love lemon, out of solidarity.
The reason I made this cake was doubly-purposed, as all the best things in life are. One, is that I wanted to create this content. One-and-a-half, I’m often making the same “signature”-ish cakes (“signature” to no one else other than my very close family and friends, so this is very tongue-in-cheek) and wanted to make something I never make. Two, it was my neighbor’s birthday!
So to the very new neighbor who I had only just introduced myself to maybe not even 2 weeks ago, so sorry it probably came off very strong to hand someone a homemade a two-layer 9″ cake for a household of two. I don’t have any small cake pans, okay!
Here’s the recipe: (portioned for a 2-layer cake – if you want to add a layer or if you only want a single-layer cake, divide each portion of the ingredients in half)
EQUIPMENT
- 1 electric hand mixer or stand mixer
- 2 8″ cake rounds (preferably aluminum)
- 1 offset spatula
- parchment paper
- 1 cake turntable, optional
INGREDIENTS:
INGREDIENTS
LEMON CAKE:
- 8 eggs whites*
- 2 tsp vinegar
- 240 g sugar
- 240 g flour
- 1 tsp kosher salt
- 8 egg yolks
- 80 ml whole milk**
- 60 ml vegetable OR canola oil
- 2 TB lemon zest (from 1-2 lemons)
- 1 tsp vanilla extract
LEMON SYRUP CAKE SOAK:
- 1 cup water
- 1 cup sugar
- 1/2 cup lemon juice (1-2 lemons)
LEMON CURD:
- 6 egg yolks
- 120 g sugar
- 1/2 cup lemon juice
- 113 g unsalted butter (1 stick), sliced into tablespoons
POPPYSEED CREAM CHEESE FROSTING INGREDIENTS:
- 16 oz cream cheese (2 sticks)
- 152 g heavy whipping cream (2/3 cup)
- 54 g powdered sugar (1/2 cup)
- 2 TB poppyseeds
*Cold eggs are much easier to separate, but you’ll want them to be room temperature once you start baking. If you don’t have too much time, it should still be fine, but follow the aforementioned for optimal conditions.
**If you don’t have any whole milk, I’ve tried almond milk in a pinch and it worked fine! The higher the fat content, the better, but other milks will still work.
INSTRUCTIONS
CAKE SOAK
- Combine water and sugar into a small stovepot. Set over low-medium heat until sugar dissolves completely Allow to cool.
- Stir in lemon juice.
- Set aside. For easy distribution to the cake, pour into squeeze bottles.
LEMON CURD
- Make the lemon curd first so it has time to cool and thick, preferably overnight. Add sugar into a small saucepan.
- Zest lemons into saucepan and massage zest into sugar with hands. This helps amplify the lemon flavor.
- Add in egg yolks and whisk until mixture is pale yellow and combined. Then add in lemon juice.
- Heat on medium-low, stirring constantly with a wire whisk until the mixture noticeably thickens and just starts to bubble. It should be thick enough to coat the back of a spoon and keep its shape, about 5-7 minutes. Take off heat.
- Pour lemon curd through a fine mesh strainer into a separate bowl to remove any bits of cooked egg or lemon zest to give a perfectly smooth texture.
- Add cold butter (sliced into tablespoons) and stir in until melted and incorporated.
- Cover with plastic wrap directly on top of the curd to prevent a skin from forming as it cools. Chill in fridge until ready to use, at least 4 hours or preferably overnight.
LEMON CAKE
- In a small bowl, add oil, milk, and extract. Zest 1-2 lemons and add lemon zest into the mixture. Leave to sit overnight in fridge, if possible. Allow mixture to come to room temperature before baking.
- Preheat oven to 305 degrees and line the bottom of two 8-inch round pans with a round of parchment paper. Do not line or grease the sides of the pans. Set aside.
- In a large mixing bowl2, use an electric hand mixer or stand mixer to beat egg whites and vinegar together until it gets frothy and opaque.
- Sprinkle in granulated sugar one tablespoon at a time (if using hand mixer, mix well between each addition). Once all the sugar has been added, continue beating until stiff peaks. To test, pull whisk attachment straight up from bowl. Meringue should stand on its own and should not move if you flip the bowl upside down.
- In a separate bowl, whisk the egg yolks until smooth. Pour yolks into meringue.
- Gently fold yolks into meringue with a spatula by hand, occasionally turning bowl 45 degrees every few turns, until no streaks remain and batter is a homogenous pale yellow.
- In a small bowl, whisk together flour and salt. Sift this mixture into the egg mixture.
- Sift half of this mixture into the egg mixture. Fold together with a spatula until combined and no streaks remain.
- Add half of oil, milk, extract, and zest mixture into the batter. Fold together until combined and no pools of liquid remain.
- Repeat steps 8 and 9 until no streaks remain and batter is fluffy and airy.
- Divide the batter into lined cake pans until about 2/3 full. Bake for 24-28 minutes or until the edges are lightly golden and a toothpick in the middle comes out dry. Tops should not be browned.
- Let the cakes cool on a wire rack for about 15 minutes. Run an offset spatula or knife around the edges and release the cakes onto a wire rack to finish cooling completely before assembling cake.
- Optional: The top layer forms an “eggy” layer that I prefer to scrape off so that the crumb of the cake is exposed. You can choose to leave on, but my opinion is that the cake is texturally better without this layer. Using a small serrated knife, carefully scrape the thin top layer of the cake. It should scrape off easily to expose the actual cake crumb underneath.2
CREAM CHEESE FROSTING:
- In a large bowl fitted with a paddle or whisk attachment, beat cream cheese on high until smooth and creamy. For optimal results to get out all lumps, wrap bowl with a kitchen towel soaked in hot/warm water.
- Add 2 cups of powdered sugar, vanilla, and a pinch of salt. Mix on low for 30 seconds, and then switch to high and beat for 2 minutes.
- Separately, whip the whipping cream until soft peaks (hand mixer or by hand recommended).
- Fold in whipping cream to cream cheese mixture.
- Add in 1 TB of poppyseeds and mix until combined.
CAKE ASSEMBLY:
- On a cake turntable, lay down the first cake layer. Pipe a thick ring of cream cheese frosting around the edge layer and fill the center with lemon curd. Reserve about 1/4 cup lemon curd to decorate the top of the cake.
- Top with the other cake layer.
- Use an offset spatula to apply a thin layer of cream cheese frosting all over the cake as a crumb coat. Chill the cake in the fridge for 15-30 minutes or until the frosting is slightly firm to the touch.
- Add a second layer of frosting with the remaining frosting. On the top layer, dollop the remaining curd in a small circle in the middle of the layer.
1: Wipe the mixing bowl and the beater/whisk attachment with a vinegar-soaked paper towel. This will ensure that there are no fat particles on the equipment that might prevent egg whites from whipping up properly.
2: I find it’s best to do this while the cake is on a wire rack with newspaper or other materials lining the bottom for easy clean-up. You can also use a tray but this requires more dishes, while if you use some material you can throw away, you can easily discard of the whole layer at the end. I always opt for the less-dishes route!
-
Bad Cook, Better Baker
Hi! I’m Sophia but everyone calls me Sophie. I’m a bad cook, but a better baker.
The ability to connect with someone else over a love of dessert, over a simple concoction of a few sweet ingredients blessed with patience and time, that’s the driver behind why I love to bake. It’s a sweet way to connect with a community, as someone who’s always felt slightly uncomfortable in social situations (in a way that we are… working through…somewhat, some days are better than others).
WordPress has been line item on my bank statement for over 36 months now, and this is my very first post more than three years later. I’ve always wanted to do this, and I just recently got inspired by a colleague at my day-time corporate job who has her own very successful blog (and juggles it SO beautifully), and so– I guess I’m doing it too!
I’ve been listening to the Food Blogger Pro podcast and once I consume enough content, it usually kicks me into action. Cheers to finally putting ideas to action!
To my friends and family who are most likely the only ones reading this: I appreciate the delulu state you let me exist in.
To myself: I’m proud of you.
Let’s have some fun!
-
Subscribe
Subscribed
Already have a WordPress.com account? Log in now.
